Sunday, May 19, 2013

Current Diaper Routine

We've been full-time cloth diapering for over 6 months now and I'm finally updating the blog!  It's pretty hectic with two babies that are starting to be mobile!!

Anyways... I thought the best way to update is to show my daily routine and explain what I do, so here goes!

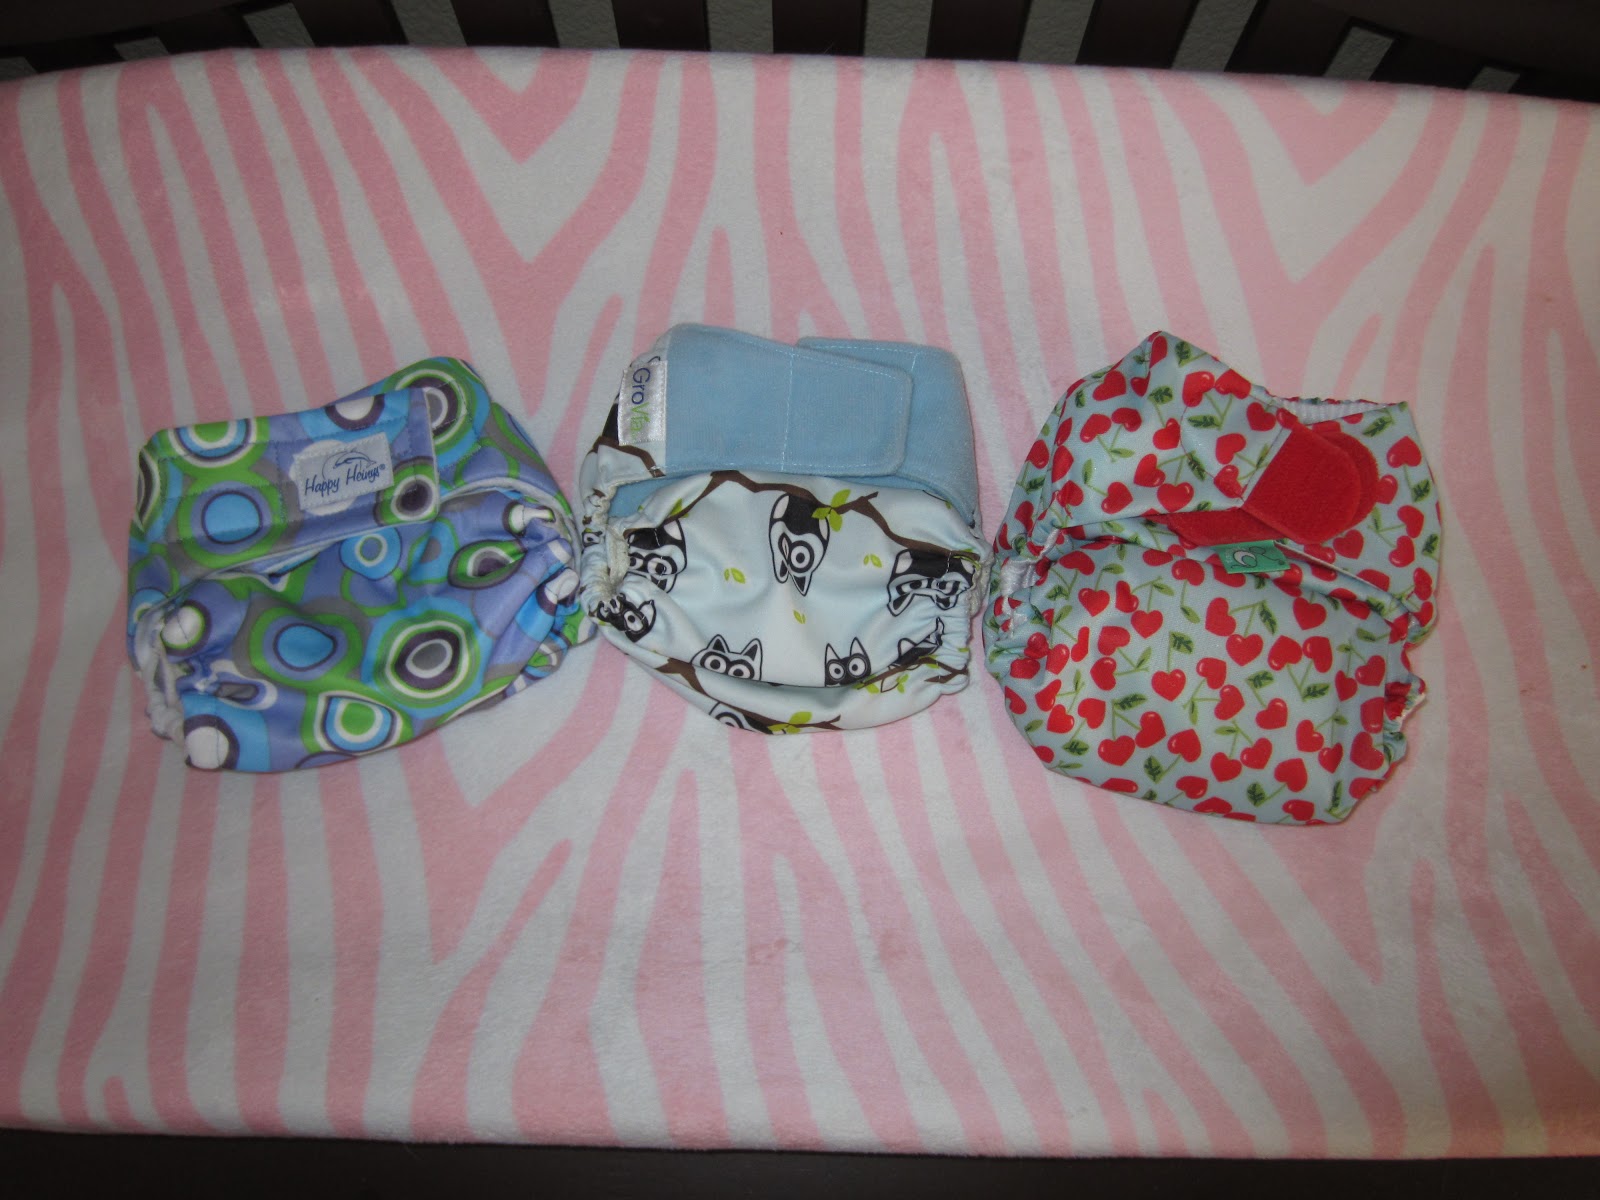
My daily diaper is still a prefold, I've had to go up in size and the girls are now wearing medium sized Diaper Rite unbleached prefolds.  The 3 dozen small sized prefolds they were in before I bought brand new for $90 and was able to sell after 4 months of use for $70!  This is why cloth rocks, I diapered my girls for 4 months for $20!  Anyways... This picture shows the unbleached prefolds (which I think are softer than the bleached prefolds), my homemade fleece liner (make sure it's MICROfleece, it helps wick moisture and poo literally washes right off the fleece), my favorite Flips covers and a Snappi.


Ok, next up is my nighttime diaper.  I learned after a few months how much I hated stuffing diapers.  Nothing is worse, after you've spent so much time washing and drying, to have to sit and sort inserts and stuff.  Some moms love stuffing, I'm not one of those moms.  I fell in love with BumGenius Freetime diapers.  They are true "All-in-ones" because the inserts are sewn directly to the diaper in the form of "petals".  When it's laundry time I simply place my handmade bamboo doublers and fold the petals in... that's it!  They're super easy to take care of and work really well as our nighttime routine.  The girls are sleeping 11-12 hours a night, and I only change them if they're fussy from a dirty diaper.


My diaper accessories inclue some OsoCozy flannel wipes, which are my go to wipes, as well as some Carter's washcloths that I picked up at Wal-Mart.  The Carter's wipes have a very soft side, but I like that the flannel wipes seem to clean up everything.  My wipe solution is really easy... I fill up the spray bottle with warm water, add a squirt of baby wash and if I'm in the mood I'll add a little glob of coconut oil.  I spray right on to the wipes as needed for diaper changes.  In case of a diaper rash I use coconut oil or Baby Anti-Monkey Butt Powder which are both cloth diaper safe.  It's important not to use thick creams like Desitin which can gunk up and decrease the absorbency of diapers (which is not what you want when cloth diapering!).  I also keep a little plastic bucket near the changing table to help with dirty diapers.  The last thing you want after you've cleaned all of the poo out of a dirty diaper is a dripping wet diaper that you have to somehow get out of the bathroom and across the living room without getting poo-ey water all over your carpet.  Trust me... get a bucket!


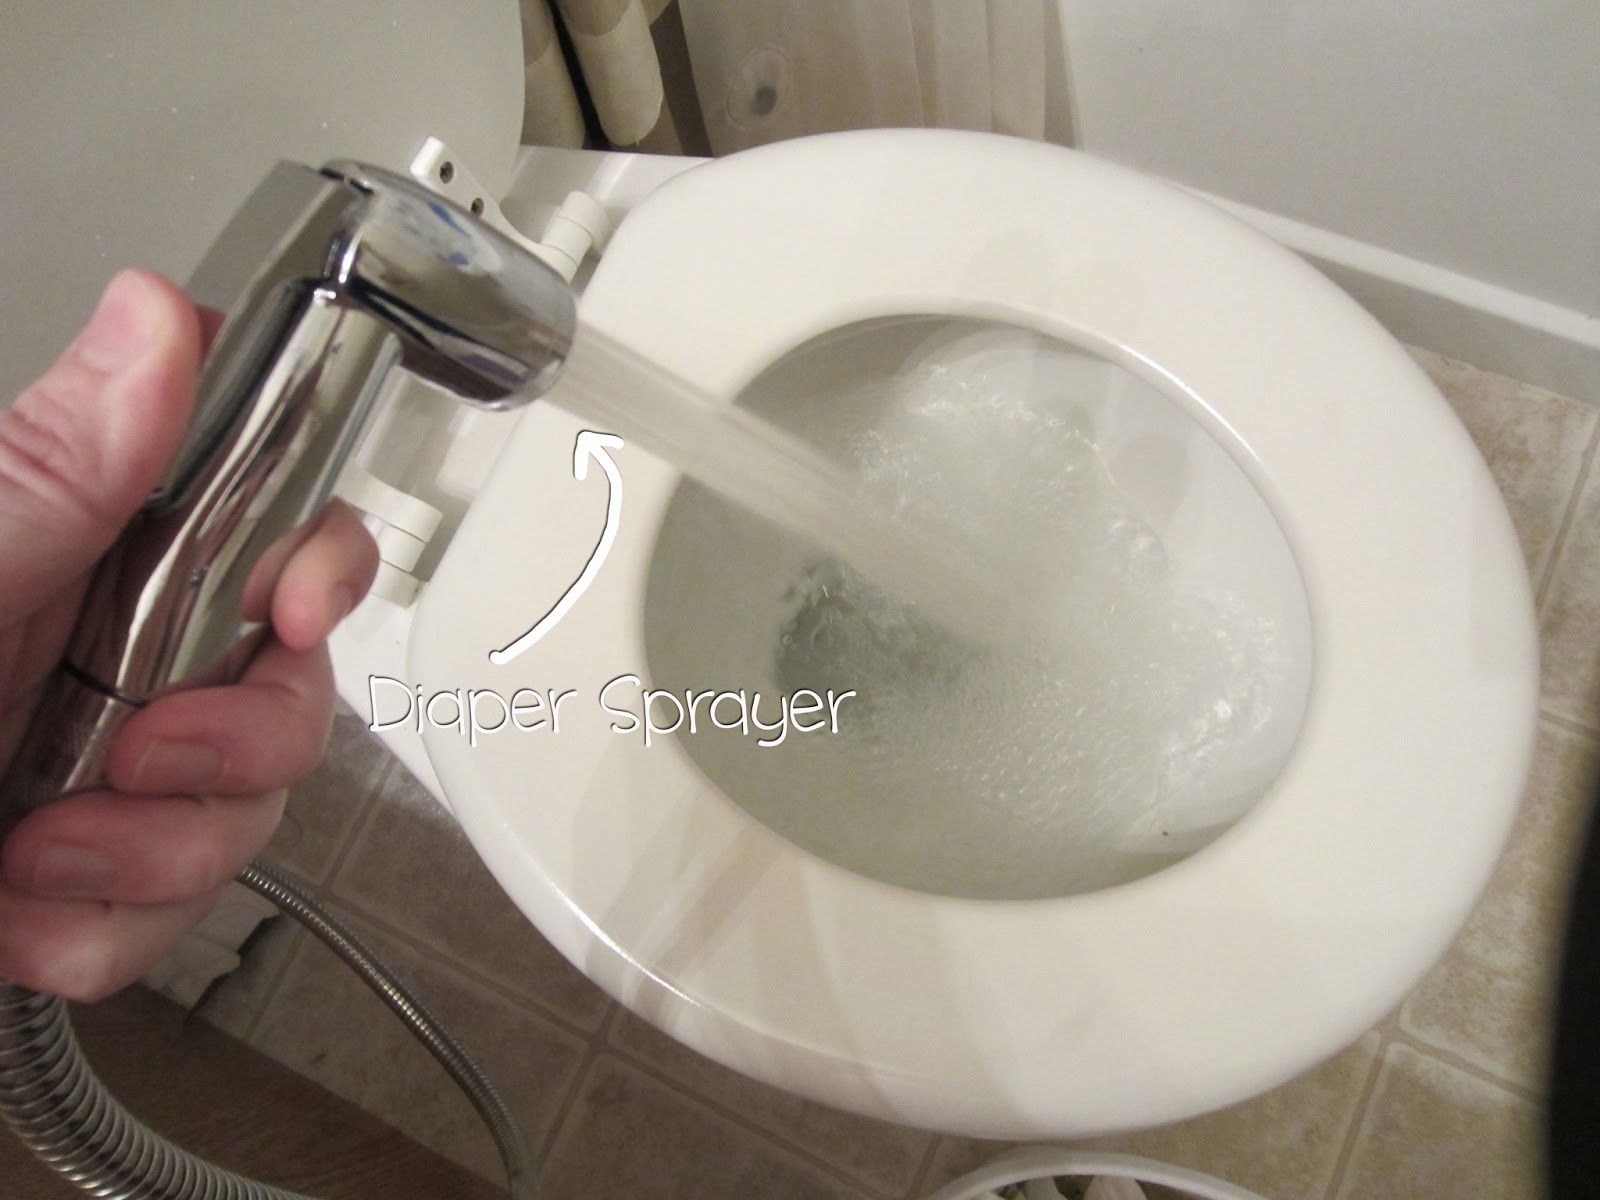
Which brings me right to my next item... a diaper sprayer.  I bought this one on Amazon and it literally took 2 minutes to install.  It's amazing.  Now that the girls have started solids and their poo is, well, more solid, this thing is a life saver.  It takes a few tries to figure out how to get the angles right so you're not spraying poo and water everywhere, but remember that you have Clorox, and it's only poo.


I keep my soiled diapers in a plastic 13 gallon trash can that I bought at Wal-Mart.  The lid is really easy to open and it keeps everything where it should be.  I use a KangaCare diaper pail liner (I have two so one is in use while the other is being washed/dried).  I also have a KangaCare travel wetbag which I love because it's big and does the job.  I don't have any stink issues, I haven't had to get any deodorizers to keep the smell down.


My wash routine is pretty basic.  I usually do laundry every 2 days, so my diapers never really sit that long without a wash.  I use Original Tide (the packaging says Tide Ultra, but it's the Original) and from every website I've been to it claims that Tide is a no-no, which is odd because there are a LOT of moms who use Tide and love it.  The bottom line for me is that I started cloth diapering to save money so the last thing I want to do is spend extra money on special detergent (that some moms claim don't even really clean their diapers).  I live in an area with hard water and for that reason alone Tide works for us.  Every now and then I add some Calgon to soften the water, which helps the detergent clean.  I also add a few quick pours of Clorox every now and then, probably not more than a few tablespoons for a full load.  It's important to be careful with bleach because it can delaminate your diapers or covers.  I've converted my little laundry nook with a tension rod so I can dry my covers and diaper pail liners without taking up space in the bathroom.  This is a perfect setup for me!


When it's time to wash the diapers I take the whole wetbag and pour the diapers into the washing machine and then flip the wetbag inside out.  I do a cold rinse set for a large load, then a hot wash set for a large load with detergent and then an extra cold rinse.  I have an old-school style washer that has an agitator, and not a whole lot of extra settings, but I've figured out what get my diapers clean.  Also, when it's time to dry I only put my prefolds, wipes, liners and doublers in the dryer, my Freetimes and covers get hung up to dry.  I dry everything on a full high heat cycle, add the Freetimes and then continue to dry on a low-heat cycle.

So that's it... that's my current routine and I'm pretty happy with it!  Hope it helps someone, and if anyone ever has questions please feel free to ask! :)

Wednesday, January 30, 2013

DIY Bamboo Doubler

As of two weeks ago my night time diaper routine was just a Rump-A-Rooz diaper with both of the 6R soakers.  The problem is that now the girls are going longer at night and I started noticing the diaper was wicking on the backside.  Personally, not my favorite thing; picking my girls up in the morning and noticing their back is damp.  So... I decided it was time to add a doubler to their nighttime diapers.  Researching commenced.  The result?  FIVE DOLLARS for ONE insert to soak up pee (and those were the cheap ones).  Seriously!?!?

I started doing research into making my own (I am not sewing savvy enough to attempt the entire diaper, but a rectangle of fabric to soak up pee? I can do that).  There are tons of blogs and discussion forums about making diapers, it's kind of overwhelming.  On top of that, most of the women who attempt to make diapers and diaper accessories are real mavens when it comes to sewing.  They have fancy techniques and expensive machines and sergers... all this stuff I don't have.  Then they get into talking about fabrics, which types to use with which foot, what stitch is the right one, top stitch and push out the seams... A whole lot of jargon I really didn't understand.  I did come across some stuff that made sense and stuck with me:

Microfiber: Very common in the cloth diapering world, most AIO's use MF somewhere.  MF cannot be put next to baby's skin, it's too irritating, so it required to be stuffed inside the diaper or some kind of layer over the top.  I've been reading that MF tends to hold on to stink and requires "stripping" to really get the odor out of the fabric.  From my own experience I have learned that I hate stuffing diapers, and MF tends to dry out my hands when I do have to stuff.  I knew right off the bat I didn't want to work with MF...

Hemp:  A lot of the more expensive doublers and inserts are made with hemp fabrics because they're really absorbent, more so than cotton.  It can get pretty pricey, too.  On the Rump-A-Rooz website a 6R soaker made of hemp is $10 each!  I've also read that hemp tends to hold on to smell a little bit, and has a rougher texture (not great to put next to baby's skin).  A better option to me than MF, but I still wasn't sold.  Then I did my research on bamboo...

Bamboo:  Seemed to me to be the best option: doesn't hold on to stink, softer and still more absorbent than cotton.  Based on the research I did there really didn't seem to be any downside to bamboo.

I was pretty disappointed that most bamboo inserts were only two layers of bamboo and had MF sandwiched in between.  I mean, didn't that negate one of the reasons for using bamboo?  I found some options that were just bamboo, but those started around $8 each!!  So I decided to make my own, Kevin and I had just bought a sewing machine as our Christmas gift to each other.  I found some bamboo fleece on Amazon and I was ready to sew...

Now... I will start out by saying that I am a beginner on the sewing machine.  I'm not even considering this a tutorial, it's just proof that I did it.  It's super simple, super basic, but it works and saved me money.

First thing I did, WASH THE FABRIC!!  I'm using this as a diaper material, so it's extremely important to wash it like everything else relating to my diapers.  I did a hot wash, no detergent and dried on the high heat setting.  It was only one wash, but I washed again after sewing and before use, so they were prepped enough to use.
Ok, once washed I did a light iron, just to get some of the big wrinkles out.  I folded it so that I had 4 layers that were as long as I wanted the inserts (about 12 inches long).

 Then I cut the width to the size I wanted, these are approximately 5 inches wide.  It's not perfect, I didn't use a straight edge.  My kids are going to pee in them... they don't need to be pretty.

 I opened up the fabric so it was only two layers

 I did a zig-zag stitch around the entire perimeter of the insert

 Once I was done with the zig-zag I folded it in half.  The edges tend to wrinkle a bit, as the fleece does have some stretch to it... but again, it doesn't need to be perfect, it's going to get peed on.

I did another zig-zag stitch across the fold in the middle.  Now it's a 4-layer bamboo fleece insert that butterflies in the middle.  I chose to do a few inserts this way after I made a few inserts that were regular old 4-layers.   

These are my 4-layer inserts... I just did a zig-zag stitch while it was folded in fourths.  They've been used about a week now and have been washed 4-5 times.  They're holding up great!

I like the idea of butterflying the insert so that it reduces drying time, but requires no extra work on my part once it's out of the dryer.

So that's it... DIY Bamboo doubler.  I add one of these to a BumGenius Freetime diaper at night and haven't had a single drop of liquid outside the diaper come morning (and that's after a full 12-hour night!).  I've already made 10 inserts and still have enough fabric to make some more if I want to.  I spent a total of $30 on 2 yards of fabric, and I consider it a great deal!

Sunday, January 20, 2013

Two Months of Cloth!

I realize how lacking I've been on this blog!!  We've been cloth diapering for two months now!  Since we started I have only put the girls in disposables once (because their fluffy diapers wouldn't fit in the newborn sized clothing!!)

Now that we've been doing this for a while I feel I have a much better handle and knowledge of what I'm doing.  I've given reviews on all of my hybrid diapers, and while they're great... nothing beats prefolds.  Prefolds are, hands down, without a doubt my favorite choice.  They're cheaper, easier to clean and require much less work in terms of laundry.

Hybrids cost about $20 per diaper (sometimes going upwards of $75 for a GoodMama) whereas a prefold costs around $2 per diaper.  You have to add waterproof covers to use prefolds, but I've gotten Flip covers on sale for $10 each, I have around 8 covers total.  Hybrids have to be stuffed and unstuffed in order to do laundry... which means you have to take out the pee-soaked insert and unsnap them before you place them into the diaper pail.  Sometimes it's pretty gross, dirty diapers sometimes need extra coaxing to get the insert out, which isn't my favorite thing to do with a wiggly, naked baby on the changing table.  On top of that, hybrid diapers have to be stuffed before you put them on, so after every load of laundry I'm sorting through the inserts, matching up the right ones and then stuffing them neatly into the diaper shells.  It's a pain in the butt.  I can't tell you how many times I'm stuffing diapers right before I'm putting them on because I didn't want to deal with all the inserts fresh out of the dryer.

Prefolds are a piece of cake... Wet diapers go directly in the diaper pail, no fuss no muss.  With dirty diapers you can actually use the diaper itself to wipe excess poo off the baby.  They go in the washer without having to do any unsnapping or unstuffing.  Once washed and dried (you can dry them on high heat without risking damage because there is no waterproof layer) you just stack them up and they're ready for use!  This is my go-to diaper during the day, I change every 2-3 hours or more often if they're fussy.  I have 3 dozen small Green Mountain Diaper prefolds and I can get by with doing laundry every other day.

In a few months I'm going to sell these prefolds and buy the larger size.  I've seen used GMD prefolds sell for about $18/dozen, which means I'll only have spent $10 for 4 months worth of cloth diapering.  So far I've spent a total of $470 on all cloth diapering products.  This includes the Snappi's, diaper pail, wet bag, wipes, wipe solution (which is free because I use water and a tiny squirt of baby wash), diaper sprayer and all diapers.  Doing the math, based on 10 diapers per day per baby, I'll even out in cost in just 2 more months (actually less because I calculated diapers only, not wipes).  That figure doesn't include selling back used diapers!

I'm using my hybrid diapers as my nighttime solution, because they absorb more (and the inner fabric has a sty-dry property so the babies don't wake up in the middle of the night because they feel wet).  I'm not a huge fan of microfiber, as I've read over and over that natural fibers like bamboo and hemp absorb more.  I bought 2 yards of bamboo fleece that I'm going to use to make my own inserts for nighttime.  I'll post another blog to let you know how that goes...

And for those friends who still think cloth diapering is gross... I STILL haven't had any poop leak out of a diaper and get onto clothing.  Nothing is worse than a poopy blowout while you're out in public.  Not only do you have a full and heavy diaper to throw away, you also have poopy clothes that you're probably not prepared to transport.  When traveling I have my travel wet bag, but I only use that for wet diapers.  If I get a poopy diaper while we're out in public I keep a few gallon size ziplock bags in my diaper bag; poopy diaper and all the smells get zipped right up and go directly into the diaper pail when I get home (that will obviously change once we start solid foods).

I hope, hope, hope that this blog and all my ramblings about cloth diapers will maybe change someone's mind about cloth diapering.  And for friends who are expecting, adding a cloth diaper just three times a day can change the environmental impact of disposables.  While this wasn't the driving force for me to choose cloth, I can't help but share how big of an impact it actually makes.  Just a thought to leave you with: the diapers that YOU were in as a baby are still in a landfill somewhere...

Monday, January 14, 2013

Let's Talk About Breastfeeding...

Even before I got pregnant I had plans to breastfeed.  I had read a lot of articles about the benefits to the baby, the myths that it helps drop all of your baby weight, and the stories about the special bond between mother and baby.  I was sold.  Being a science-minded person I also couldn't help but think that it's the most natural thing and it's basically one of the reasons our species is still around... I mean, cavemen didn't have formula.  When the idea of one baby became the reality of two babies cost became a major factor.  I'm also the type of person who likes to take a challenge head on, "Oh, breastfeeding twins is tough? Watch me..."

My "birth plan" (which is a term I use very loosely because I really was at the mercy of the twins and the doctors) was to have a natural deliver and have immediate skin on skin time with the girls.  I had read over and over that this skin to skin contact in the first hour of life makes breastfeeding a million times easier.  I also read that this is a crucial time for mother baby bonding.  I told my "plan" to my doctor, who nodded away like it was all going to work out exactly as I wanted it to.  Hahaha... 31 hours later as I was being wheeled in to the operating room for my C-section I knew skin to skin was no longer an option.  At that point I was so delirious with medications and exhaustion that I no longer knew nor was vocal about what I wanted to happen once the girls arrived.

Because of the c-section, the medications that followed and hospital policy I had to wait an agonizing 8-hours before I could get out of bed and be wheeled to the NICU where the girls had been taken.  My daughters were now 8-hours old and I had yet to hold them which obviously meant they had not had any milk from me.  I am so thankful that I delivered at a hospital that uses donor milk; I signed a waiver before the girls were born stating that I would allow the girls to receive donor milk instead of formula if I weren't able to breastfeed, so they got a few feeds-worth of donor milk before I was able to attempt to breastfeed.

The first time I attempted to breastfeed I felt really silly.  It all seemed so natural in my mind while I was pregnant, but the first time you hold your baby and the lactation nurse wants you to put your breast in your baby's mouth it's like, "Um... you want me to do what??" I think trying to breastfeed in the hospital was the most stressful thing EVER.  The lactation consultant, who didn't seem very knowledgeable anyways, is a complete stranger that gets all up close and personal with your breasts.  On top of that, I was overwhelmed with having two newborns in my life that were MINE and the reality that I had to care for these two tiny little babies.  Plus visitors and nurses that checked in every hour (day AND night) and pain from having your abdomen cut open and lack of sleep... it was very stressful.

For those who aren't familiar with breastfeeding I'll give a quick lesson.  When a woman gets pregnant and her body makes all the hormonal changes, the milk ducts in her breasts will start to work.  They don't produce milk right away but rather a thick, yellow liquid called colostrum.  Most breastfeeding moms call this "liquid gold" because it's extremely nutrient dense and gives the baby important antibodies to help their immune system.  Babies can usually survive the first few days on colostrum alone until the milk comes in.  It can take a few days for a woman's milk to come in, and usually takes longer after a c-section.

I would try to nurse every single chance I got, sometimes they would latch and get something, sometimes they wouldn't.  The first 24-48 hours were a blur... I really don't know how often I nursed, or how often they would fill their bellies from me alone, but I would nurse until they fell asleep and then pump.  I pumped, and pumped and pumped.  If I nursed them I would pump after they finished, if I let the nurses feed donor milk, I pumped and then gave them whatever I pumped for the next feed.  One night Kevin really wanted me to get some sleep, so he told the nurses to feed the girls in the nursery for the next two feeds because he wanted me to get some sleep.  I set the alarm on my phone to go off every three hours and I woke up and pumped (initially Kevin was mad, but once I had established my milk supply he realized why I was so adamant about pumping).

Breastfeeding has one very simple driving force... supply and demand.  If nobody is demanding milk your body doesn't supply it.  If the baby is demanding more milk your body will supply more.  Based on that principle, if the girls were getting donated milk or milk from my last pumping session  I still needed to demand more milk from my body, hence, all the pumping.  It was hard, grueling work to pump that much, but it paid off.  The day after I left the hospital my milk came in.

I wish that were the end of the story, that the moment my milk came in breastfeeding just magically became second nature... but it's not.  The first two months were tough... really tough.  Breastfeeding is exhausting, it takes time and patience, it will wear down your resolve.  I cried more because of breastfeeding in the first month than I did the entire time I was pregnant (and I cried a good amount while I was pregnant, lol).  I had plenty of moments where I would have paid someone to bring me formula in the middle of the night, and I actually tried to swindle deals with my husband a few times.

I have to take a moment to talk about how important a good and supportive partner is.  While I was pregnant I had a lot of conversations with Kevin about breastfeeding.  Would it be weird for him?  Would he support me?  Would he feel left out?  What would be his role if I were the main source of food?  At first I think he was really freaked out that I started off so many conversations about my boobs, but all of those conversations were vital to the success of breastfeeding.  Kevin did his own research, he was supportive and helpful, and in my dark moments when I was ready to quit he always had encouraging words to get me through.  If you're planning to breastfeed, make sure your partner is not only on board, but totally comfortable with it!

Ok, for now... that's all I've got, or at least all I have time to write.  The girls are waking up from their nap and require my undivided (ok, equally divided) attention.  I have so much to write about breastfeeding, so there is plenty more in store!

To any of my friends/readers who want/plan to breastfeed, if you have any questions or need support please don't hesitate to contact me!

Friday, November 23, 2012

A Week into CD...

So we've been in cloth diapers for a week now, and I must say I'm pleasantly surprised.  First of all, dirty diapers that would have easily been blowouts in disposable diapers were completely contained.... which means no yellow stains on their clothes!  (One dirty diaper was in a brand spankin' new white sleeping gown, it's still pristine white)  Another wonderful outcome is that we've only had minor leaks... sometimes our fault (note: always tuck the prefold completely into the cover, otherwise their clothes will wick moisture from the prefold).  I'm also thrilled to say that it really isn't too much work as opposed to regular disposable diapers.

I keep the girls in prefolds during the day and change them before every feed, unless they're fussy in which case they get an extra diaper change.  With prefolds, diaper changes have just a few extra steps from a regular diaper change.
1) Take off the cover
2) Place the prefold and liner in the diaper pail
3) Wipe (I'm using cloth wipes, too... I just spray a solution onto a little wash cloth, wipe and then toss in with the dirty diapers)
4) Put on the new prefold and Snappi in place
5) Replace the cover
It takes a few days to get the hang of it, getting used to the Snappi and getting the general setup in place, but now it feels pretty comparable to a disposable diaper change.  Wet diapers go right into the diaper pail, no fuss, no muss.  Dirty diapers get rinsed out before going into the diaper pail, since the girls are breastfed their dirty diapers are pretty tame.  People who don't have kids will probably think, "Wow, she's way too involved with baby poop."  Truth is, getting pooped ON while changing a disposable was worse than rinsing out a soiled diaper.

Anyways... at night I tend to use the AIO's and pockets, just because it's one less step in the middle of the night.  When I do laundry I sort and stuff all the diapers, so they're sitting in the changing table just ready to be put on a baby.  I've figured out already which diapers I like more than others...

Grovia AIO: I initially thought I liked the side snaps... well, I can tell you they're a pain in the butt in the middle of the night.  Plus, because of the inserts and the way the extra fabric of the snap flap folds, you have to make sure the insert is closest to the baby, and the flap is on the outside of the insert.

Charlie Banana: I said I didn't like the fact that this doesn't have a rise adjustment, but I realized while using it that the elastic in the leg is adjustable, which helps with rise.  Another thing I like about Charlie Banana is that for the price, it's a pretty good deal.  This is a $20 diaper that comes with two inserts, the smaller being good for younger babies, the larger for larger babies and doubling up for naps or overnights.  Another nice thing, these diapers are widely available and sell in packs of 6.

BumGenius 4.0: I'm torn as to whether or not I really like Aplix (velcro).  On one hand, it's much easier to put on and get a nice snug fit without having to re-adjust snaps.  On the other hand, it's an extra step to make sure the velcro is folded in on the laundry tabs.  Also, since I've only been using them for a week, I have NO idea how they wear in the long run.  I think the price is also compelling me to want to love this diaper... I mean, it's $18 a piece!

TotsBots: One of my favorites... It's a great diapers, the ease of the velcro and not having to stuff inserts after doing laundry is wonderful.  In the middle of the night this is one of the first diapers I reach for.  One downside is this seems to be a UK company, so only certain types of TotsBots are available in the US.

Swaddlebees:  Just like the TotsBots, this is a really easy to use diaper.  The only thing I have to do after laundry is make sure the insert is positioned straight inside the pocket.  I LOVE the pattern on this diaper, too... it's so cute!  However, I'm trying not to fall in love with this one, because it's a bit pricier. **Update... this is not my favorite diaper.  It takes FOREVER to dry.  Based on the price, I'm not too upset about not loving this diaper.

Flips cover:  Officially my favorite cover.  I'm immediately buying more of these covers (luckily they're on sale for Cyber Monday, buy one get one free).  They contain messes SO well and fit the girls.  I also like that they're wonderful now while I'm folding the prefolds in place, but when the girls are a little bigger I can simply place the prefold inside the cover without having to wrap it around the girls.  Double duty!

Rumparooz: No really dirty diapers yet, so I still don't know how that double gusset will clean up... but this diaper is winning me over.  It's a great fit, comes with two different sized R6 Soaker inserts AND is locally made in Colorado.  I will gladly pay two extra dollars to a company that makes their products in the good ole US of A!

Kissaluvs: This diaper doesn't fit yet... so no review.  :(

Thursday, November 15, 2012

Cloth Diapering... The Beginning

So I'm on day 3 of cloth diapering... I had intended to try and cloth diaper from the start, but we were given Preemie and Newborn size disposables, plus I was dealing with the blood clots.  I tried a few times to use the cloth diapers, but when they were still under 8 pounds they leaked right out of the leg holes.  With all that behind us, we've moved on and are successfully cloth diapering.

We're using Green Mountain Diaper prefolds and a variety of covers: Flips, Econobum and Thirsties.  I can tell you right now, I already like the Flip covers much better than the other two.  The Flip covers seem to be a bit sturdier, I like the double snaps along the waistline as opposed to a single snap on the Econobum and Thirsties.
From left to right, Econobum, Flips, Thirsties

Our first overnight with cloth diapers we actually reverted back to disposables, because I knew Avery would wake up every time she felt the least bit wet... she's very sensitive to a wet diaper.  (I'm really hoping this means she'll be quick with potty training)  So after doing some research I went to JoAnn's and bought some microfleece.  I got two yards worth of fabric, which ended up totaling about $15.  I just cut it into sections that will cover their diaper area and then place the cloth diaper on like normal. 
This is the Microfleece liner (the pattern was on sale) and it basically has two benefits: 1) it has a wicking property which helps to draw the moisture away from their skin, letting them FEEL dry, and 2) it will collect the dirty messes a little better which will make cleaning a bit easier.

Now on to the NEW cloth diapers!  I've managed to acquire quite a few different types of diapers, ranging from fitted, covers, AIO's and pockets.  I took pictures of each type both closed and opened, and I'll go through each diaper and what I think of it (before actually using them).  My plan is to use the whole variety and figure out which ones I like best, and then build up a stash based on that.

 Ok, the first set... from left to right, Swaddlebees, Rumparooz and Kissaluvs

 Swaddlebees: This is an All-in-One diaper, it has a soaker insert that is sewn into the diaper, supposedly the agitator in the washer will pull out the soaker and help get it clean.  This diaper has a more natural fiber that lays against the skin.  I also LOVE the pattern, but this is one of the more expensive diapers.

Rumparooz: This is a pocket diaper that comes with two microfiber inserts that snap in all different sorts of ways.  Options are great, but I can tell this is going to be time consuming to snap the soakers to accomodate my needs.  It also has a double leg gusset, which may be good, or may be bad.  I can see the good side; it will help keep messes contained, but I can aslo see this being a huge pain to clean.

Kissaluvs: This is an All-in-One diaper that also has an attached soaker.  Just like the Swaddlebees, the soaker should get pulled out and cleaned while in the washer.  The thing I already like about the Kissaluvs is the interior color, the beige fabric will hide stains much better than bright white.

Next set, from left to right: Charlie Banana, BumGenius 4.0, Grovia AIO


 Charlie Banana:  This is a pocket diaper that comes with two soakers and has a microfleece lining.  I didn't realize when I purchased this diaper that it doesn't have a rise adjustment, so we'll see how that works with the girls.

BumGenius 4.0: This is a pocket diaper that comes with two microfiber soakers.  The interesting thing about the inserts with this diaper is that they can be snapped together to localize absorption.  Just like the Rumparooz, this may be time consuming to do after every laundry load.  This is also one of the hook and loop (velcro) diapers.  There are tabs for the closures at the top to keep the velcro from catching while in the wash.  Most of my stash is snaps, but I wanted to make sure I try some hook and loops, too.  I'm hoping I like this diaper, because it's the least expensive of the bunch.

Grovia AIO:  This is an All-in-One diaper that has one attached soaker, and an additional soaker that can be snapped in.  I like the print on this diaper, I also like the snaps on the side.  Just like the Kissaluvs, I think the cream color will be less likely to show stains.

Next batch: from left to right... Happy Heiney, Grovia Cover, Tots Bots (Thanks Holly!!)


Happy Heiney: This is a pocket diaper that didn't come with any soakers.  To use this diaper I'll have to use one of the other soakers OR insert a prefold.

Grovia Cover: This is a diaper cover, I'd have to use a Grovia soaker, which has a cover that's ok to touch baby's skin (microfiber soakers are stuffed into pockets and don't lay against the skin, the Grovia soakers have a different top layer)

TotsBots: This is an All-In-One diaper, similar to the Kissaluvs and Swaddlebees, this diaper has an attached soaker that tucks under itself to increase absorbency. 

Last batch: Kissaluvs fitted, and two Gdiapers


 Kissaluvs fitted: This is a really soft fitted diaper, it's used just like a prefold... meaning that it still requires a waterproof cover.  It's a little bulky, so I'll probably wait until the girls are a little bigger to use this one.  Also, depending on how I like the Kissaluvs AIO's, I might skip the extra step of adding a cover that the fitted requires.

Gdiapers: While these are incredibly cute covers, I'm not sure how I'll like the use of these.  I have to wait a while, as these diapers don't have a rise setting.

So that's the diaper situation up to now.  All of my pockets/AIO's are in the wash as I type and I'm ready to start trying them out.  I've already done one load of prefolds in the laundry, and it really is quite simple.  I'm going to try and have Kevin take a video of the prefold diaper routine, just so I can show how easy it is.  A few extra steps from the disposables, but it's not too much of a hassle.

Wednesday, November 14, 2012

Orlando Trip in December

Saturday 15th:
Land in Orlando, Dinner with the Landers

Sunday 16th:
Dinner with the Harts @5pm

Monday 17th:
Hanging out with the Landers

Tuesday 18th:
Hanging out with the Harts

Wednesday 19th:
Hanging out with the Landers

Thursday 20th:
Dinner with friends @ Red Lobster, 5pm

Friday 21st:
Hanging out with the Landers

Saturday 22nd:
Time with the Harts @ 9am
Time with the Landers @ 12pm

Sunday 23rd:
Time with the Harts' @2pm

Monday 24th:
Evening at the Landers

Tuesday 25th:
Christmas Morning with the Landers
Christmas Dinner with the Harts @ 12pm

Wednesday 26th:

Thursday 27th:

Friday 28th:
Dinner with the Harts @ 5pm

Saturday 29th:
Morning with the Landers